 加载中…
加载中…如何建造一座意面桥
标签:
意面桥手工制作桁架桥 |
分类: 建筑模型 |
本站相关转帖:什么是桁架桥?http://blog.sina.com.cn/s/blog_a976f0010102vvu4.html,什么形状的桥体最强壮?http://blog.sina.com.cn/s/blog_a976f0010102v6xj.html
**Make
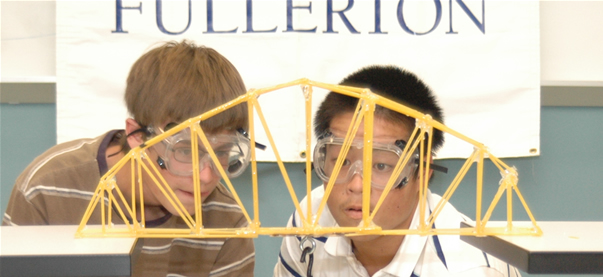
sure the sides are straight up!(保证桁架垂直!)
This has a raised roadbed.
以下介绍直接去网站翻找,有承重比赛的视频:
https://sites.google.com/a/bcsemail.org/wdstem/bridges/how-to-build-a-bridge
http://www.sciencenc.com/event-help/tower.php
How to build a pasta bridge(如何建造一座意面桥)
This is the Pasta Bridge that Munn built!(这是Munn的作品)
Materials:(材料)
-Paper for blueprint (11 x 17
inches)(设计蓝图)
-1/2 box linguine (or
spaghetti)(半包意面)
-10-12 glue sticks (4 inch
mini’s)(点胶棒)
-Mini-hot glue
(low-temp)(类似502的胶水,或热熔胶、AB胶)
STEPS TO BUILD YOUR OWN PASTA BRIDGE!
步骤:
STEP 1: Research Bridge
Truss designs. (研究桥梁桁架的设计)
(这个链接有一些介绍)Link tofor Bridge
Resources (WD-STEM Bridge Site)
(这个链接有一些介绍)Link to
STEP 2: Blueprint.
Draw an exact drawing of the SIDE-VIEW of your
truss.(按照1:1的尺寸画设计图)
<<Must “span” 40 cm. (The opening is 40 cm).
(它的要求是跨度40cm以上,也就是说,你的桥应该设计得比40cm还要长)
*This is an of
the Whipple Truss.(这是Whipple桁架的演化版,我增加了一些对角,并保持中线对称)
*I added extra diagonal supports to the center (around
where
the block will be.)
**In my next design, I’ll have the diagonals meet exactly in the
center, rather than off-center.
STEP 3: Glue
two strands of pasta together the length
of the truss along the bottom.(黏合底部两条梁)
<<THE FIRST TWO STRANDS ARE HERE.
STEP 4: Glue the outside
frame and verticals.(黏合外框)
STEP 5: GLUE the diagonals.
**You can measure them before glueing, OR
as illustrated, glue then cut off the
extra…carefully!(黏合对角线。可在黏合前测量,或如图所示,黏合后切断多余的,这时候要非常小心!)
STEP 6: Do it again! Make a second
truss for the other side.(同样把对侧做好)
STEP 7: BLUEPRINT
#2: The bottom frame (a.k.a. “the frame for the
roadbed/deck)(设计并画出底部蓝图)
<<Notice the cross bars of the bottom frame line up with the
vertical braces on the truss. (注意底部边框线与上桁架的垂直支架的位置关系)
STEP 8: GLUE the frame for the bottom.(黏合底部框架)
STEP 9: Glue the roadbed/deck onto
the bottom frame.(黏合底部“桥面”)
<<Hole in the middle for the eye-hook!(中间的孔是为了放承重块的)
<<Full length spaghetti that crosses next to each other in
the middle section (where the block will
be!).(有些部分的意面是重叠粘贴的,这样可以延伸长度并且增加强度)
STEP 10:
Glue bottom
frame to one truss. (It’s easier to glue together
with the truss on its side.)
(将底部和两侧桁架黏合)
STEP 11: Glue the other truss on the other side of the bottom
frame.
STEP 12: Measure how wide the bottom of the
bridge is. Break pieces this
size to connect the trusses.
Then glue the trusses together with the
pieces.(用合适长度的连接梁黏合两片衍架)
<<Top view. Glued across and
diagonally.(俯视图,包括横向连接和斜向连接)
STEP 13: Add the block (5x5x2 cm) and eye-hook.
Hang over 2 tables with a 35 cm
span.(这是他的测试,只在35cm跨度下,别忘了我们的比赛要求是40cm)
STEP 14: TEST! Put a sheet or tarp under your
bridge.
*Attach a large cup or bucket to the eye-hook.
*Slowly add measured weight until it breaks! (or almost
breaks…)(逐渐加压直至桥梁垮塌或即将垮塌…)
Examples of Spaghetti Bridges(一些例子):
This has a raised roadbed.
HOW WILL YOU ENGINEER YOUR TRUSS DESIGN?
https://sites.google.com/a/bcsemail.org/wdstem/_/rsrc/1353523112793/home/Design%20Process.jpg
Historic Bridges pdf Descriptions and History of
Bridges
https://docs.google.com/file/d/0B3NwJJWg7A4ARmp6WHlpbXB
More examples and information on Truss Bridges on
Wikipedia
Examples of Truss Bridges on wikipedia
Examples of Pasta Bridges at a competition
Brainpop video on Bridges (log-in required)
Steps to Build a Truss Spaghetti Bridge**
![]() 喜欢
喜欢
0
![]() 赠金笔
赠金笔
前一篇:什么是桁架桥
后一篇:意面桥竞赛规则及参考作品