Android拉伸图片用的是9.png格式的图片,这种图片可以指定图片的那一部分拉伸,那一部分显示内容,美工给的小图片也能有很好的显示效果。
http://images0.cnblogs.com/blog2015/763790/201506/142046529889487.jpg拉伸图片 .9图片拉伸的制作和使用方法" />
原背景图片 http://images0.cnblogs.com/blog2015/763790/201506/142038310359903.png拉伸图片 .9图片拉伸的制作和使用方法" />可以看到原背景图片很小,即使在再长的文字,背景图片的圆角也不会拉伸
制作###.9.png
打开Android
的sdk>tools>draw9patch.bat,将图片拖进去开始制作###.9.png
http://images0.cnblogs.com/blog2015/763790/201506/142054260045021.png拉伸图片 .9图片拉伸的制作和使用方法" />
点击四周即可添加黑点,拖拉黑点可成线。图片四周的黑线和黑点都有不同的意思。
上面黑线或者点表示纵向可拉伸的区域 一般一个点即可
左边黑线或者点表示横向可拉伸的区域 一般一个点即可
下面表示纵向填放内容的区域 一般是一条黑线
右边表示横向填放内容的区域 一般是一条黑线
 1 <</span>RelativeLayout xmlns:android="http://schemas.android.com/apk/res/android"
 2     xmlns:tools="http://schemas.android.com/tools" android:layout_width="match_parent"
 3     android:layout_height="match_parent" android:paddingLeft="@dimen/activity_horizontal_margin"
 4     android:paddingRight="@dimen/activity_horizontal_margin"
 5     android:paddingTop="@dimen/activity_vertical_margin"
 6     android:background="@android:color/darker_gray"
 7     android:paddingBottom="@dimen/activity_vertical_margin" tools:context=".MainActivity">
 8
 9     <</span>TextView android:text="@string/hello_world"
10         android:layout_width="wrap_content"
11         android:layout_height="wrap_content"
12         android:gravity="center_vertical"
13         android:background="@drawable/bg"/>
14
15 </</span>RelativeLayout>
|
|
网址:http://www.cnblogs.com/pigface/archive/2015/06/14/4562863.html
问题:::
文字已经超出了图片的消息框范围,杂乱无章。
出现上述问题的原因是,整个背景图被完全拉伸了,而且拉伸后的图片的宽高比例与原始图片的宽高比例不同。如果只对原始图片矩形消息框中的区域进行拉伸,那么就可以解决上述问题。
为了解决上述问题,我们可以使用Android中的.9.png格式图片,即Nine-patch。
下面对.9.png格式图片进行一下说明:
首先,.9.png格式的图片本身就是.png格式图片,不过该图片以.9作为文件名的后缀。我们可以将一个.png图片转换成.9.png图片,.9.png图片比正常的.png图片在图片最外围的四边多了1px边框,我们可以在这最外层的1px边框上定义图片的可拉伸区域以及图片的内容区域。
我们对原始的背景图进行编辑,可以得到如下的文件名为message.9.png的图片:
http://files.jb51.net/file_images/article/201601/201601050951444.png
网址:http://www.jb51.net/article/77482.htm
加载中,请稍候......
 加载中…
加载中…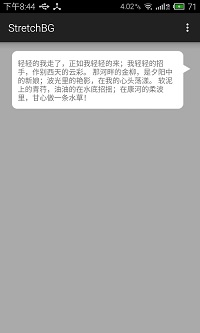